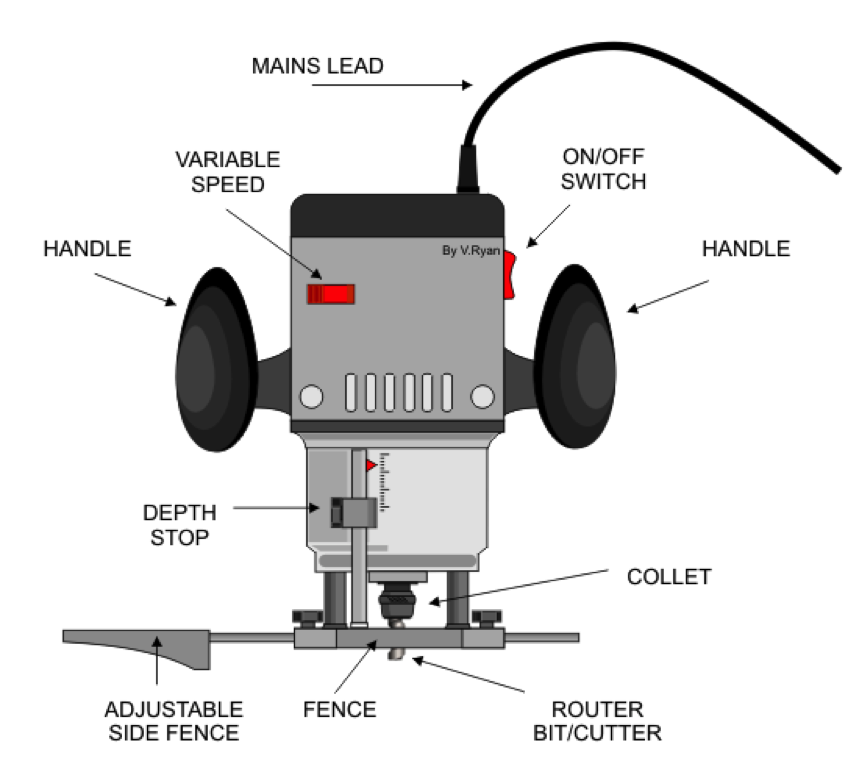
If you’re a carpenter then I’m pretty sure a router is very familiar to you. It’s something that works the same way with a drill, the difference is instead creating a hole, a router uses it’s bits to cut out a shape from the surface of a material. Routers could readily be bought at a hardware, and they come in different varieties, models, and sizes. But one question asked by people who uses a wood router for the first time is that “ how can they install the bit of a router correctly?” This question is very common because the other parts of this tool is pretty much standard, while the collet and bit has to be installed and adapted on your own. So let me tell you how to do it in this article. The best straight line sanders will help you complete the process faster and better.

Installing a router bit just takes 5 steps:
1. Choose a bit that is appropriate.
As I’ve mentioned earlier, bits and routers come in different varieties. Bits come in different sizes, shapes, functions, so you could pick one appropriate to your need. Also, don’t forget to make sure that it’s sharp because a dull one could damage your project.
2. Make sure that the router and bit is clean
Friction could be caused by sawdust and crust, and friction could cause the temp of the router to rapidly increase, that would cause a decrease in the durability of the router. So always make sure to clean the bit and collet before every use.
3. Insert the bit into the collet
Make sure to insert the bit into the collet until it reaches the bottom of the collet.
4. Make sure that you adjust the height of your router
Whenever the shank would reach the bottom of the collet, make sure to slowly pull back the bit for about 1/8 to 1/6 inch. This skip shouldn’t be skipped because you would cause the collet and shank to squeeze. And this squeeze would result to friction. The point is, whenever you don’t pull it back, the bit will heat up and get bigger, and if there’s no space between the shank and collet it would cause damage to the routers bit.
5. Tighten your collet nut
Make sure to use a wrench appropriate to tighten nuts and not put too much pressure.
Step 5: tightening the collet nut
Use an appropriate wrench to tighten the collet nut, with a firm pressure, but not so hard.
Tips:
- Routers come with manuals most of the time, make sure to read and understand it carefully. Understand and know the specification and features of your routers model, especially if it’s your first time to use it. Make sure that whatever bit you purchase, it is the appropriate one.
- Make sure to properly wear your safety gear every time you will work on your project. And that includes wearing glasses, gloves, and ear plugs or other hearing protections.
- Every type of bit has an ideal router speed, so before starting make sure you know it. incorrect speed could damage your bit.
- If the shank of your bit isn’t longer than ¾ when incased should be replaced and no longer used, that could cause instability during use and might cause accidents or damage.
Conclusion
Basically, routers aren’t hard to use, you just have to make sure that you know about it and that you read and understand every instruction. Also, keep the five steps on installing a router bit in your mind. Good luck!
Generally, a router is not so difficult to use. Just make sure that you will read the instruction carefully before using it. And remember five steps to install a router bit in this article, you will get familiar with it soon. Good luck!
Leave a Reply